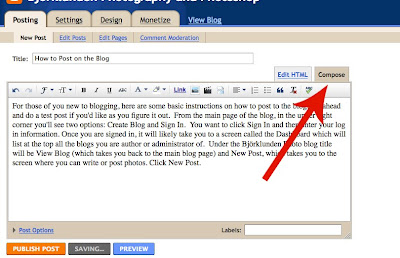
For those of you new to blogging, here are some basic instructions on how to post to the blog. Go ahead and do a test post if you'd like as you figure it out. From the main page of the blog, in the upper right corner you'll see two options: Create Blog and Sign In. You want to click Sign In and then enter your log in information. Once you are signed in, it will likely take you to a screen called the Dashboard which will list at the top all the blogs you are author or administrator of. Under the Björklunden Photo blog title will be View Blog (which takes you back to the main blog page) and New Post, which takes you to the screen where you can write or post photos. Click New Post. This is the screen you will see (click to make it larger). (Make sure you see the tab entitled Compose in beige so that it's easier to work with).
The main box is where you can enter text (as you can see I am in the process of when I took this screen shot). Add a title in the title box and start typing away in the paragraph box. You can change your font, size, bold, italic, underline, color, etc, just like in Word or Pages. It will save periodically as you go, but it's never a bad idea to save it yourself here and there by clicking on the save button.
Now, let's add a photo. Look for the little icon of the photograph along the tool bar at the top of the post box. Click on it.
A box will pop up and ask you to upload a photo. From there you can Browse on your computer until you find the photo you want to upload. Often, I find it easiest to save the photo from photoshop to my desktop (in addition to the regular location in which I save it) so that I can easily find it without having to browse through my entire Pictures folder. Click on the file/photo you want to upload. It will start uploading the photo (time will vary based on file size-- it's never a bad idea to save the photo as a copy to the desktop as a smaller file size to save time and computer memory during uploading). The photo you have most recently uploaded will be highlighted in light yellow. Then click OK in that box and your photo will appear in the text in your box at the location of your cursor. There you can pick what size you want the photo to display and right, left or center justified. I recommend picking Large most of the time. It will be a small photo on the main screen, but every photo can be clicked on to see the full size. It's also not a bad idea to add a watermark to your photos so that people cannot steal them off the blog page and use them as their own. Maybe that'll be tomorrow's Photoshop lesson.
When you are done entering text/photos, click Publish Post. Then click on View Blog or View Post at the top of that next page. If you are not happy with the appearance of the post or find a typo, you can, at any time, edit your post by clicking on the little pencil icon at the bottom of your post.
It will bring you back to the Post screen with all the text and photos in place as you left them. Then just click PUBLISH POST again when you are done. You can do this as many times as you need to but will not update the time/date of the post so it will stay in order on the blog.
Have fun! Email with questions!


No comments:
Post a Comment