It's getting closer, only:
164 days, 19 hours, 57 minutes, 58 seconds,
until Sunday, July 31, 2011 at 4:00:00 PM
Note, we now have a new countdown timer on the top right! Now you can keep up with how many days until 2011 Photography seminar. Make sure you're registered!

Wednesday, February 16, 2011
Fun with Food: Photos from the NY Times
Thought you'd like to see some professional documentary photography on a restaurant in NYC as a follow up to Phil's assignment this summer of taking pictures of food. Here is a slideshow:
SLIDE SHOW: Revisiting Escoffier: Grant Achatz's New Restaurant
SLIDE SHOW: Revisiting Escoffier: Grant Achatz's New Restaurant
Thursday, February 3, 2011
Fade by Phil Krejcarek in Exhibition
Photographs by Phil Krejcarek will be on display in Sheboygan, WI as part of the Inaugural Group Exhibition through EFFJAY Projekts. Congratulations, Phil!
Artist Statement
PHILIP KREJCAREK
During the past two years, I have been investigating the concept of dreams in my work. Part of that research has centered upon memory and how it might fade, or slip away over time.
I am particularly interested in the Surrealist painters and their thoughts about the subconscious.
The Images that I have been creating are my attempts at visualizing this notion.
At first, I started with making images as light as possible, while still being able to see them. Then, I worked on how dark an image could get.
In the future, I would like to work with scale. I would like to produce images that are mural or monumental in scale.
http://www.wix.com/frankjuarez/effjayprojekts-exhibitions
Wednesday, February 2, 2011
Slate Mondrian

Karen's Mondrian made me think of the slate table that I can see while seated at my computer. Part of it is a good match! Fun to "see" new patterns in everyday things. Stay warm, Claire
Tuesday, February 1, 2011
Karen's Mondrian
Wow--amazing that you could find bark (I assume it's bark) that mimics Mondrian.
Sorry I haven't been able to find time to do any of the assignments, though they do sound interesting and challenging. Will have to try harder.--Ruth
Sorry I haven't been able to find time to do any of the assignments, though they do sound interesting and challenging. Will have to try harder.--Ruth
Reminder: How to Post to the Blog
Since Claire, Phil, and I are the only ones posting photos, I thought I'd better refresh everyone's memories as to how to post.
Click here to go to How to Post to the Blog
Click here to go to How to Post to the Blog
Making a Watermark
So, let's get started. The commands for this are the exact same in PSE or in full version Photoshop.
Open PSE (Photoshop Elements) or Photoshop and then open the image you want to work with. Make any edits you want, such as cropping, exposure, etc, till you have your "final product."
Then, select the Type tool from the tool bar on the left of the screen. It's the capital T, 9 tools from the top. Note in the image to the left that it's slightly darker gray because it's selected. (As always, click on the images to enlarge them for easier viewing).
Across the top tool bar, you'll be able to select your font. Pick one that is pleasing to you and make the size about 40 pt just so you can see it to work with it. In my screen shot, it shows Myriad Pro and 48 pt. Make sure your color is selected as Black. Note there is a black square in my tool bar. This is where you can pick your color by clicking on the drop down arrow and picking black. Make sure it's black.
Once you've typed your text, click on the Arrow tool, the top one in the left tool bar.
Okay, so now we have our text on our photo. Here's my sample:

First, grab one of the corner handles (the little squares on the corners in green) and resize it to fit what you like. Then, move your mouse arrow near the same handle until it changes into a curved arrow with two points. Click and rotate the text as you desire. Then accept that (by hitting enter or click on the green check mark. If you ever want to try it again, click the red "ban" sign instead of the green check mark. Also, to undo something, go to to the Edit menu and click Undo). When you rotate, sometimes it'll go off the photo, so just grab the line of text and move it to where you want it.
Here's my sample rotated and moved:


Go to the top tool bar where the options are File Edit Image Enhance Layer Select Filter View Window Help. Click on Filter, then click on Stylize, then Emboss.

When you click on Emboss, you'll get a dialogue box asking you to Simplify the text. Click OK
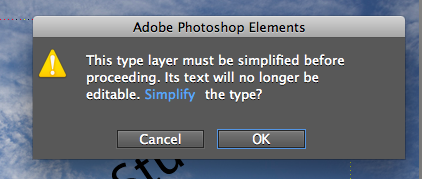
If the Emboss dialogue box is covering your image, just click on the light gray bar that says Emboss, and move the box so you can see your image and text. Then, set your angle to 135 degrees, the height to 3 pixels, and the amount to 100%. You can make some small adjustments, but I don't recommend changing it by much except the angle. You can set the angle anywhere, though. When you've set your numbers, click ok. It should now look roughly like this:

Great, we're almost there. The last step is to change the opacity of the text. This is where it turns into a watermark. Go back to your layers palette on the lower right corner of your screen.
Note that just above your top layer (in this case it's my text layer), is the word Opacity with a 100% after it. Click on the little arrow next to the 100% and move the slider towards the left. You can watch it change the appearance of the text on your image. Move it to around 40% or again, whatever looks good to you. Voila! You have your watermark!

Now, with a lighter photo, you make need to make your watermark more opaque (closer to 50% or more) and with a darker photo, you can get away with a less opaque, maybe less than 30% even.
For my Björklunden friends, as always, email me with questions. I'm happy to even walk you through it over the phone, so email me with your phone number and we can set up a time over the phone to walk through it together. Have fun and post more pictures!!!
Phil's Photos on Exhibit
 I am currently exhibiting two photographs in the Milwaukee Area Teachers of Art Exhibition at Carroll University. This photograph was part of a series entitled, "Installation Art and Photography: A Surrealist's Journey," which was done in collaboration with Kate Loehrer, senior photography major at Carroll.
This is the other photo.
Subscribe to:
Posts (Atom)