Monday, June 18, 2012

How to Post to the Blog- Updated for 2012

For those of you new to blogging, here are some basic instructions on how to post to the blog. Go ahead and do a test post if you'd like as you figure it out.  From the main page of the blog, in the upper right corner you'll see two options: Create Blog and Sign In.  You want to click Sign In and then enter your log in information. Once you are signed in, it will likely take you to a screen called Karen's Blogs (on which Karen would be substituted with your name), which will list at the top all the blogs of which you are an author or administrator.


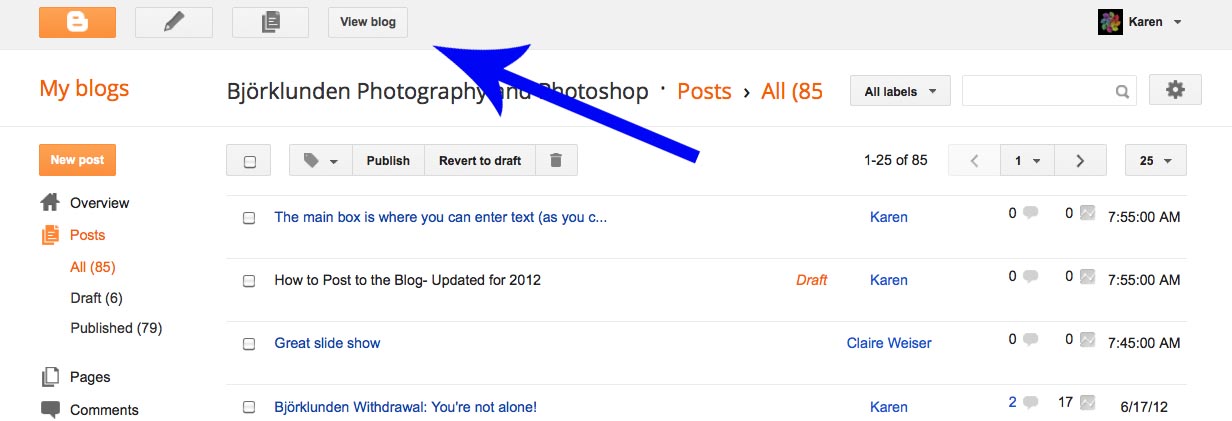
At the far right of the Björklunden Photo blog title will be View Blog (blue arrow), which takes you back to the main blog page.  To make a new post, look for the big pencil icon in an orange box (red arrow). If you hover over that icon, it will say, Create New Post, which takes you to the screen where you can write or post photos. Click the pencil/New Post. This is the screen you will see (click to make it larger).  (Make sure you see the tab entitled Compose in slightly darker gray [blue arrow] so that it's easier to work with).


The main box is where you can enter text (as you can see I am in the process of when I took this screen shot). Add a title in the title box (red arrow) and start typing away in the paragraph box. You can change your font, size, bold, italic, underline, color, etc, just like in Word or Pages. It will save periodically as you go, but it's never a bad idea to save it yourself here and there by clicking on the save button.

Now, let's add a photo. Look for the little icon of the photograph along the tool bar at the top of the post box (red arrow). Click on it.

 
A box will pop up and ask you to upload a photo.


From there, click on Choose Files and find your photos on your computer until you find the photo you want to upload. Often, I find it easiest to save the photo from photoshop to my desktop (in addition to the regular location in which I save it) so that I can easily find it without having to browse through my entire Pictures folder. Click on the file/photo you want to upload. It will start uploading the photo (time will vary based on file size-- it's never a bad idea to save the photo as a copy to the desktop as a smaller file size to save time and computer memory during uploading, but that's another lesson). The photo you have most recently uploaded will be highlighted in blue. Then click Add Selected in that box and your photo will appear in the text in your box at the location of your cursor. There you can pick what size you want the photo to display and right, left or center justified.  I recommend picking Large most of the time. It will be a small photo on the main screen, but every photo can be clicked on to see the full size. It's also not a bad idea to add a watermark to your photos so that people cannot steal them off the blog page and use them as their own. But that's also another lesson available in the archives.

When you are done entering text/photos, click Publish (red arrow).


 Then click on View Blog at the top of that next page.


 If you are not happy with the appearance of the post or find a typo, you can, at any time, edit your post by clicking on the little pencil icon at the bottom of your post (you must be logged in, however, so if you don't see the pencil icon there, double check that you're actually logged in).


To comment on a post, simply click where it says 2 comments (might say 0 or some other number). Then enter your comment. It will make you log in with your blogger/google ID to post a comment, so if you're not currently logged in, expect to see a box where you enter your user name and password.

Remember, all posted content is PUBLIC, so anything you say, post or comment on can be seen by anyone. Also, the ability to comment on photos is also public, so if you get strange comments or see unrelated comments, don't be alarmed. Lastly, only people from this class or past classes can write a post, so any new titled post is from someone we know from a past Bjorklunden class, though they may have been in a prior year.

Great slide show

Nicely done, June class and compiler Karen! Loved seeing your photos and a few familiar faces. Can't wait for the July class! Claire

Sunday, June 17, 2012

Björklunden Withdrawal: You're not alone!

Since we had so many rookies in the June class, I thought we should review Björklunden Withdrawl for everyone and let you know you're not alone in dealing with it. Bethany and I described the emotional state in 2010, having suffered it for the third year in a row. While it is not a recognized DSM-IV diagnosis, it is very real. But there is hope! Specifically, hope for Björklunden 2013!

To come to an understanding of Björklunden Withdrawal and coping mechanisms including our very own 12 step program, view the blog from summer 2010:

http://bjorklundenphoto.blogspot.com/2010/08/how-does-this-happen.html

June 2012 Class Slideshow

The June 2012 "beginner" class was a great success! We had a couple of returning students as well as a number of rookies who wanted to get to know their cameras and learn more about taking better photographs.  We are proud to say we have successfully converted more people to Björklunden Photo groupies, and discovered some great talent in people who had never done much photography.  It is always wonderful to see people learn new skills and really enjoy photography and Photoshop. We hope to see you back in years to come!

Thursday, June 14, 2012

Thursday's Lesson

HDR in Elements
  • Have your two (identical) photos of different exposures open
  • File > New
  • Photomerge Exposure
  • TA-DA!
Depicting Motion
  • control motion with the TV mode (you control the length of time the shutter is open)
  • Stop Action - You stop the action completely with a very fast shutter speed. 
  • Panning - You have to move the camera with the moving object.  The goal is for the environment to be blurred and the moving object is still.
  • Blurred Motion- The objects that are stationary are clear but the moving object is blurred.  You  need to have a slow shutter speed.

Wednesday's Lesson

How create a "twin" in Photoshop
  •  Photograph the same person in two places in the same scene.  Don't have them overlap the same space in the scene.
  • Use a tripod, or stay in the same place for each shot, aiming at the same scene.
  • Open both portraits in Photoshop.
  • Click the Lasso Tool.  Roughly select the subject in one of the portraits (with the background showing).
  • Edit >Copy.
  • Click on the other portrait and Edit > Past.
  • Click on the Move tool.  Hold and drag the pasted selection so that it matches the background.
  • Use the eraser tool and in small movements, erase the overlapping images without erased the people.

How to fill a picture frame with another image
    • Click on the Magic Wand tool.  Click on the white space inside the frame.  If the selection did not include all the white, hold the Shift key and click on the other spaces.
    • Open an image to be pasted into the frame.
    • Select All (or select a part of the image).
    • Edit > Copy.
    • Click on the image with the white areas selected.
    • Edit > Paste Into.
    • Edit > Transform > Scale.  Hold the corner anchors to adjust the size and hold in the inside of the selection to position the scaled image.  Hit the return key.
    Portraits and Self-Portraits
    •  Shooting with a solid background is great because all of the focus is on your subject.
    • If you don't have a solid background make sure it is blurred out so that any images in the background do not take away from the attention to your subject.
    • Adjust your angle... Don't always take the shot from straight on.  People look different from different angles and it will have a different effect.
    • Lighting is extremely important.  Noon and early-mid afternoon lighting is very harsh (keep that in mind).  You may want to diffuse your lighting (make it softer).  Lighting from different angles adds a lot.  If it is coming from the side it is called Rembrandt lighting (a Phil favorite).  If you aim into the light you will get a silhouette.
    • You don't have to capture a face for it to be a portrait or a self portrait.  You can take pictures of body parts (i.e., hands, feet...), shadows, etc.
    • Although shadows can be very artistic... watch for unwanted harsh shadows (such as on someone's face).